Instructions to turn RaspBerry Pi 2 and Raspicam 1 into a powerful True Random Number Generator
These instructions shall support a contribution to 33C3 – they are untested yet. Early Feedback is welcome. I would like to rework these instructions until end of december. For them to be streamlined when 33C3 starts.
mechanical preperation
- connect Raspicam and RaspBerry Pi
- plug an IDE-cable (40-poles) into RaspBerry Pi’s Gpio-interface.
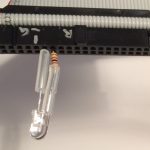
- solder a resistance to the cathode of a white LED. Resistance of 100 ohm is a good choice. It helps to verify the current. If you measure a voltage drop of 350 mV at the resistance, you conclude that current is at save value of 3,5 mA
- Optional: put a insulating tube around the cathode. This is helpful to avoid accidental short-circuits.
- Plug LED into open side of IDE-cable. Anode should be connected to contact Nr. 12, and cathode with resistor to Nr. 14 (see Foto below) Upper row from left to right is counted 1, 3, 5… Pay attention to the marker which indicates contact 1. The lower row is counted 2,4,6 etc.
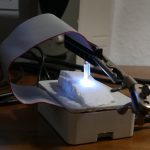
- cut a diffusor from a piece of styrofoam (see Foto below)
Software
- update your RaspBerry Pi or install a fresh linux. These instructions refer to RaspBerry Pi Revision 2. (RASPBIAN JESSIE, Release date: 2016-02-09 https://www.raspberrypi.org/downloads/raspbian/ https://www.raspberrypi.org/documentation/installation/installing-images/mac.md (exemplary command to copy a downloaded image onto the SD-card: sudo dd bs=1m if=2016-02-09-raspbian-jessie.img of=/dev/rdisk3)
- Assuming that the Pi booted to the graphical user interface. Go to: Settings/Raspberry Pi Configuration/Interfaces to activate the camera. Go to: Settings/Raspberry Pi Configuration/Localisation to choose appropiate values for language, time-zone, keyboard. If you want WLAN, Click top-right on the Netzwork-icon.
- add „dtparam=i2c_vc=on“ to /boot/config.txt – this enables access to channel 0 of I2C-Bus. That is the means to communicate with the camera (exemplary command to edit the file: sudo nano /boot/config.txt )
- From home directory invoke this command:
wget -q -O – http://intere55ant3szeug.felixluebeck.de/zufallszahlen.tar.gz | tar xvzf –
This will do the Download and unzip of „http://intere55ant3szeug.felixluebeck.de/zufallszahlen.tar.gz“ - invoke once: „zufallszahlen/installationsskript“.
- invoke after each reboot: „zufallszahlen/einschaltskript“. This will switch on the white LED an. Make sure the LED aims at the camera, and its light passes through the diffusor (see Foto below)
- optional: plug a Memory-Stick. Assuming that the Pi booted to the graphical user interface, the Memory-Stick should be mounted automatically. To save the random numbers on Memory-Stick, edit the script „zufallszahlen/runskript“. Replace „-mb -mb“ by „-gb -gb“ and give the path to the Memory-Stick.
- invoke „zufallszahlen/runskript“. After approx. 20 Seconds there come some messages, a sort of statistic which tells wether the light is OK. (see example here) Then production of random numbers starts.
- at /media/ramdisk/ you will find some statistics and the file stderr.txt, which contains a collection of error-messages, warnings and debug-information. And there you will find a file with random-numbers – except if you use a memory stick.
Fotos